Tutorial: adding new icons to generals.
What you need
1)XCC Mixer
2)Notepad
3)Paint
4)Image(s)
Background
Traditionally each cameo was stored as a separate image. Not so in Generals, now all the cameos are compiled into sheet of images (in the .tga format). There is then an INI file which carves up these images into what we called “Mapped Images”. So basically the INI has a list of coordinates that signifies each individual image and then you assign a name to it. There are two types of cameos-small and large. The large is used for when the unit or building is selected, and the small for every other function. In this tutorial I will focus in on the small cameos, but the large work in the exact same manner.
Step 1
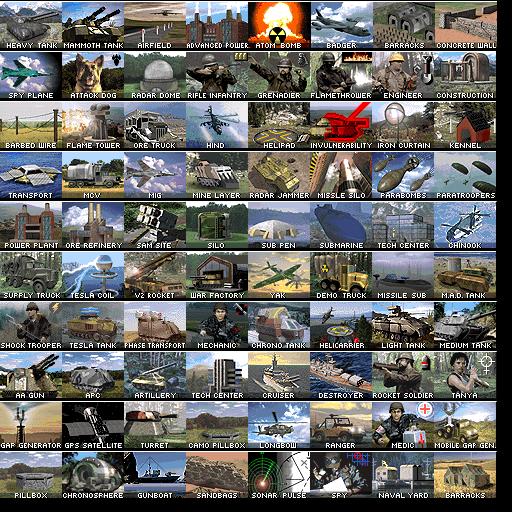
The first thing you need before adding cameos are well, cameos. I have attached a couple sheets for you to use, or you could make your own if you please. Small cameos are 62x50 pixels and large are 122x98 pixels. You should make sure your cameos are this big before you begin trying to add them in. Open up paint and have the image size be 512x512. You should then start copy and pasting all your cameos in a grid like fashion starting in the upper left and leaving no room between them. Remember that the small cameos are 62x50, and in example A, the space I leave is part of the cameo. You will have extra space on right and bottom, so don’t worry about that. So once you have all the cameos you want to work with ready, save the image in the .png format. Generals uses the .tga format, so you will have to convert it XCC Mixer.
Step 2
Since we’re in XCC Mixer, lets take the time to look at our Generals or Zero Hour directory. One big difference you will notice is that the cameos sheets are located in different places in the two games. Generals has the sheets in the textures big, while Zero Hour has them hidden away in the EnglishZH big (at least for me, since I have an English version). Since we now know where the images are stored, lets looked to where the INI is stored. Go back to the main directory and go to the INI big. You will have to scroll down a bit, and you will see a whole section dedicated to mapped images. This are very important because you can copy and edit these in the future. Personally this is what I did, but I have provided you with a sample INI in the attachment.
Step 3
If we’re gonna get our cameos to work in game, they need to be in the right directory. So if you don’t already have these folders already, you are going to need to make them.
For Generals:
Generals\Data\INI\MappedImages\TextureSize_512
Generals\Art\Textures
For Zero Hour:
Generals Zero Hour\Data\INI\MappedImages\TextureSize_512
Generals Zero Hour\Data\english\Art\Textures
In both cases that sheet that you made should go in the folder called Textures. You are probably wondering what to call that folder, and as far as I know you can call it whatever you want. However, you should make sure you are not naming it the name of an already existing file. The following are already in use:
SAUserInterface512
SCUserInterface512
SNUserInterface512
SSUserInterface512
SUUserInterface512
Personally I only changed the second letter of the name and kept everything else. Each of the above is for a different faction, and each has multiple versions of it, each ending with _xxx where xxx is a number.
So the full name of the first sheet I have attached is SGUserInterface512_001.tga.
Step 4
So you have all your directories set up and your sheet(s) is in place, now all you need is the INI to tell the game how to read them. You can edit the one I attached for in the future or you can extract another one from back in the directory. The basis entry looks like this:
MappedImage SASpyPlane
Texture = SRUserInterface512_001.tga
TextureWidth = 512
TextureHeight = 512
Coords = Left:373 Top:301 Right:433 Bottom:349
Status = NONE
End
The first line names the cameo, the second tells what image to look for it on(**this is your sheet**). The next two lines say how big the sheet is, and the Coords line tells where on the sheet the specific cameo is. It’s simple enough you can just figure it by looking at the image in paint, or you can edit an already existing INI which has a sheet that has matching coordinates. Once you have named every image and given the correct coordinates, save the INI using the same base name as the sheet, and move the INI in the correct directory. The images are now ingame!
Step 5
You’re not done yet, even though the cameos are in, nothing is said to have them! So go around and edit them in. Use the names you gave to the cameos in the INI and paste them over the images you want to replace. The Command button INI and the INI for all your units and buildings all have tags for their image. “ButtonImage“ for the small one and SelectPortrait for your large cameos.